Navigation: Records > Person > Contact
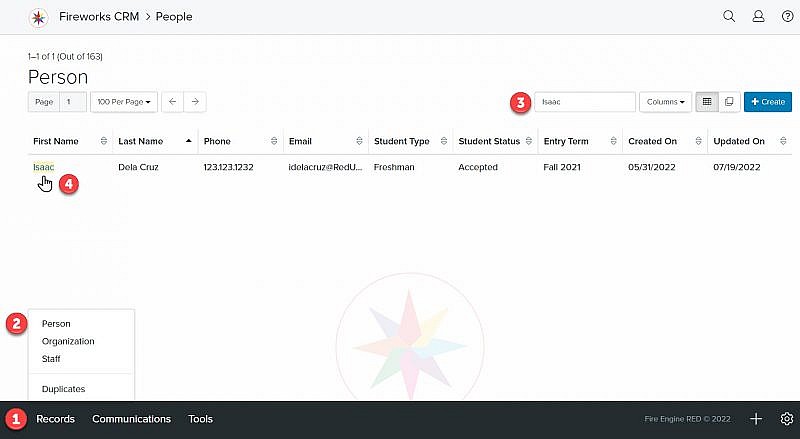
- From the bottom navigation bar, click Records
- Click Person. The Person Manager will display.
- In the Search field, enter the name of the person record you want to add a contact record to or scroll through the list of people records on the page
- Click the name of the person. The Person Record page will display.
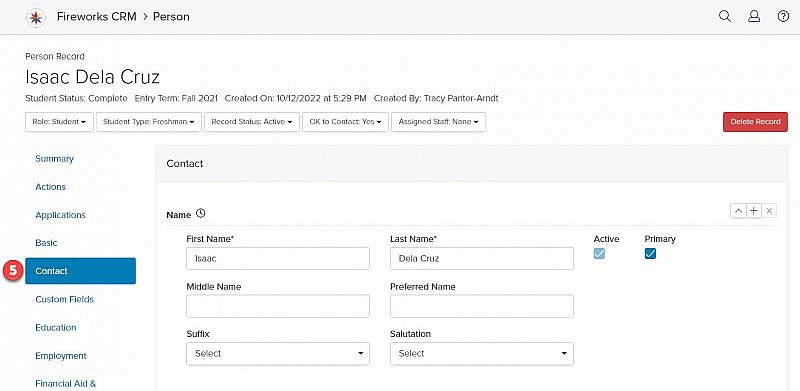
- Click the Contact tab. The contact fields will display.
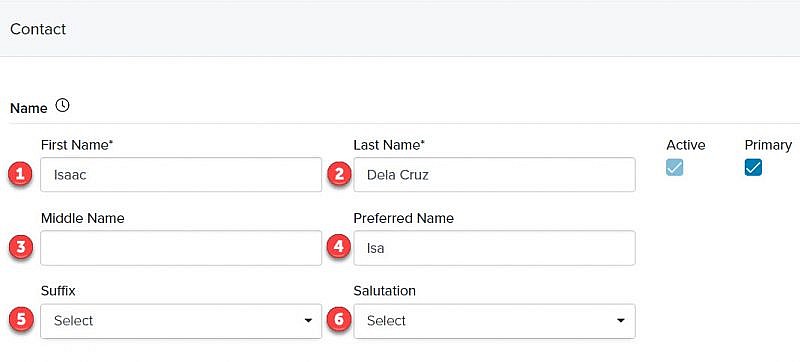
Name Field Group
- First Name*: Enter the person’s first name
- Last Name*: Enter the person’s last name
- Middle Name: Enter the person’s middle name
- Preferred Name: Enter the person’s preferred name
Tip: The preferred name will display in the person record header
in parenthesis after the full name of the person. - Suffix: Select the person’s suffix (e.g., Jr, Sr, II, III) from the Suffix dropdown menu
- Salutation: Select the salutation (e.g., Dr., Father, Ms., Mr., Professor, Reverend) for the person from the Salutation dropdown menu
- Click Save Changes
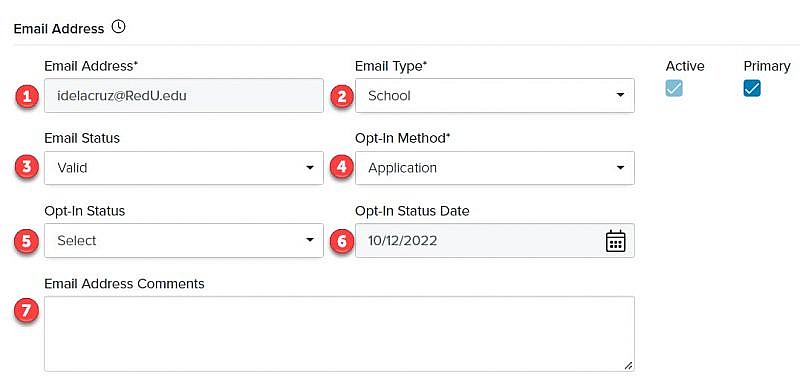
Email Address Field Group
- Email Address*: Enter the person’s email address
- Email Type*: Select the type (e.g., Business, Other, Personal, School) of email address from the Email Type dropdown menu
- Email Status: Select the person’s email status (e.g., Valid, Bounce, Spam Report) from the Email Status dropdown menu
- Opt-in Method: Select the method (e.g., Application, Campus Visit, College Fair, Inquiry, Student Search) that was used by the person to opt-in to receiving email communications from the Opt-in Method dropdown menu
- Opt-in Status: Select the person’s opt-in status (e.g., Subscribed, Unsubscribed) from the Opt-in Status dropdown menu
- Opt-in Status Date: The date the person agreed to receive email communications
Tip: Opt-in Date field is view-only and is assigned by Fireworks. - Email Address Comments: Enter additional information about an email address, if appropriate
- Click Save Changes
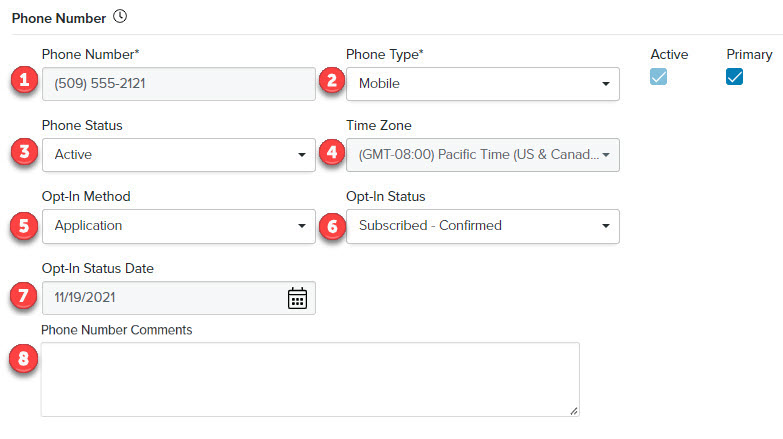
Phone Number Field Group
- Phone Number*: Enter the person’s phone number
- Phone Type*: Select the type (e.g., Business, Fax, Home, Other, Mobile) of phone number from the Phone Type dropdown menu
- Phone Status: Select the status (e.g., Active, Disconnected, Do Not Call) of the phone number
- Time Zone: The person’s time zone
Tip: The Time Zone is view-only and is assigned by Fireworks based on the person’s area code. - Opt-in Method: Select the method (e.g., Application, Campus Visit, College Fair, Inquiry, Student Search) that was used by the person to opt-in to receiving texts from the Opt-in Method dropdown menu
- Opt-in Status: Select the person’s opt-in status (e.g., Subscribed, Unsubscribed) from the Opt-in Status dropdown menu
Tip: If a mobile phone number is set to Subscribed – Not Confirmed, Fireworks will automatically send a message to the person’s phone number requesting that they confirm their subscription. Once that message has been sent, the status will remain Subscribed – Not Confirmed until the person either confirms their subscription or unsubscribes. - Opt-in Status Date: The date the person agreed to receive texts
Tip: Opt-in Status Date field is view-only and is assigned by Fireworks. - Phone Number Comments: Enter additional information about the phone number, if appropriate
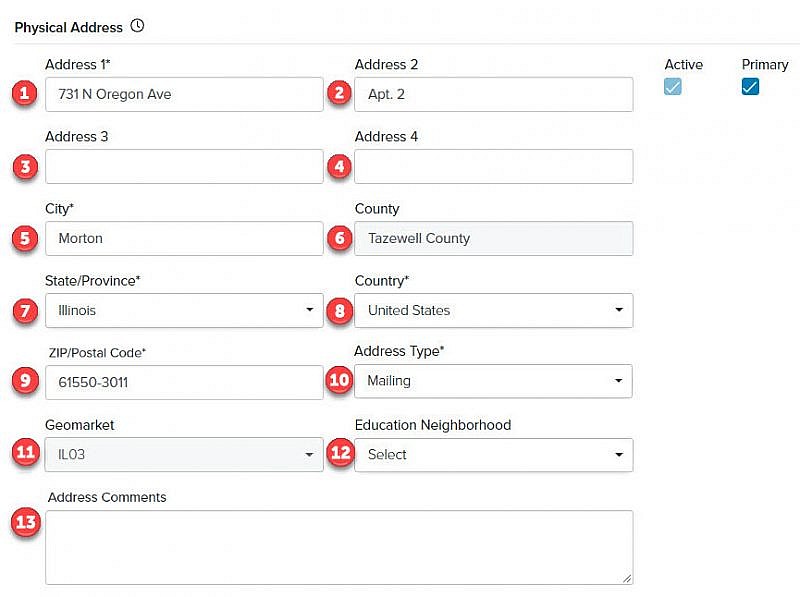
Physical Address Field Group
- Address 1*: Enter the person’s street address or postal box number
- Address 2: Enter the person’s additional address information, if applicable
- Address 3: Enter the person’s additional address information, if applicable
- Address 4: Enter the person’s additional address information, if applicable
- City*: Enter the city or town where a person resides
- County: The county where a person resides
Tip: The County field is view-only and is assigned by the Fireworks based on the person’s ZIP code. - State/Province*: Enter the state where the person resides
- Country*: Enter the country where the person resides
- ZIP/Postal Code*: Enter the person’s ZIP code or postal code
- Address Type*: Enter the person’s type (e.g., Home, Mailing, School) of address
- Geomarket: The geomarket where a person resides
Tip: The Geomarket field is view-only and is assigned by Fireworks based on the person’s address. - Education Neighborhood: Enter a score defined by the institution
- Address Comments: Enter additional information about the person’s physical address, if appropriate
- Click

